- 浏览: 880195 次
-

文章分类
最新评论
-
mxdxm:
总结不错,赞
NoSQL学习笔记(三)之BigTable -
itbj00:
不错,有实际案例的文章,看着简单。
以公司实际应用讲解OpenStack到底是什么 -
追梦--:
赞一个!
数据库插入百万数据 -
enet_java:
<artifactId>PM_Member_EAR ...
使用maven2 打ear包
从Android界面开发谈起
转自:http://blog.csdn.net/nieweilin/archive/2010/10/26/5967815.aspx
这篇文章没有打算有一个很好的逻辑去介绍android的某个方面,全盘大致上就是我接触、了解android的ui开发后到现在的一些感想以及个人理解吧!
全文可能会涉及到java、android开发、android源码研究、设计模式等各方面的初级知识,属于典型的杂侃天下,深入研究还需要各位和我一起给力、加油了!
好了,废话少说,开动!
一、楔子:android界面开发意味着什么
第一个问题,android界面开发涉及到了哪些方面。
当你接触过一段时间的android应用开发,了解到了一些android的知识后,你应该能够在心中形成这样的印象:android的开发分为两块。一个是资源部分,一个是资源操作部分:详细点说的话,就是一个是对资源的导入、设置、整合等这些方面的工作,另一个就是对资源的调用、使用、控制(甚至改变)等这些方面的工作。前者在一个典型的android工程中的表现形式就是assets文件夹中的音频、视频等原生资源文件和res文件夹中的各式各样的xml文档文件以及形形色色的图片文件——很容易想到的是,这些东西是无法程序在运行时改变的,也就是静态的。后者在android工程则表现为src文件夹和gen文件夹中各式各样的java文件(有的是你手动输入生成的,有的则是adt通过aidl自动生成的),而通过开发人员的设计以及实现,这部分在应用运行时是可能发生改变的,也就是动态的。
而界面的开发便处在了这样一个极为重要的位置之上:沟通资源和对资源的操作(后者我们还可以简述为软件的“功能”)这两个部分。也就是说,如果你想要做出一个最低标准为“差强人意”的android界面的话,你至少首先对android的两大开发部分有一个大致上的了解——你得会写xml代码,以至于你可以形成一个又一个的还算符合逻辑的界面结构;你得学会P图(或者让会P图的人懂得该给你P什么图),抑或搜图,从而可以为你的界面准备一些养眼的图片资源,以给人眼前一亮的感觉;你得掌握android.widget包里面的一些常用类的使用方法以及一些使用技巧,从而可以让你的资源在应用运行时可以以很舒服的形态展示出来;你甚至得对android的窗口运行、管理机制有一定的了解,以到达更自由地定制界面特性的目的.....
另外一个问题就是,android界面开发到底体现在哪些地方。
这个问题就不得不提到用户体验这个永恒的话题上了,用户体验好,你就成功了一半。而用户体验的很大一部分就是界面的各种相关。让我们罗列出下面几个条件:
1.你的应用和用户打交道的就是,而且仅仅是它的界面
2.界面是沟通程序后台功能和用户的接口
3.界面有好坏之分
4.人是喜欢好的东西的
不知道你得出了什么结论,我的是:界面开发很重要,是不可敷衍了事的!
你也许会反驳我:如果功能实现的不完美,动不动就崩溃,界面再好又有什么用?是的,作为一个和我一样的“程序猿”,这样想是非常符合“骡迹”的,但一个对你的应用没有任何了解的客户却不是这么想的——他第一眼看到的仅仅是你应用的界面,而不是你的数据库是咋么工作的(能看到的话,估计黑客早就OUT了)——界面好看不,好用不?这些都是他所感受到、体验到的。只有这些类似于第一印象的东西在客户心中打下了获得好感的基础,客户才会有进一步了解你这个应用的欲望:应用程序东施很贤惠,数据库工作稳定,占用系统资源极少,但长的确实后现代了点;应用程序西施功能基本上没啥特点,有的功能东施都有,而且都不及东施,有时候甚至会导致系统崩溃(亡国),但就是界面极为人性化(也就是漂亮)。就是这样的两个应用,当摆在客户勾践面前的时候,该小白就选择花一美元买下西施,送给了上级夫差。
也就是说,想让客户相中你家应用,就得在它的界面上多下功夫。
其实刚开始我也是对界面这一块不以为然,以为它属于整个android开发流程中最为短期、最为轻松的部分,所以就打算用最快的速度弄完界面后和其他成员一起去进行功能上的开发。但是后来我才发现这是导致我们项目烂尾的最初起源之一:我的界面决定了整个应用的功能模块分布情况,不仅仅会影响到用户体验,而且在某些方面甚至会影响到功能模块的设计以及开发。而我的界面却没有像想象中完美,所以后来在功能开发完成后,我们都45度斜望着自家应用,泪流满面。
把以上的文字总结为一句话就是:界面开发很重要,因为它直接关系到用户体验,而且间接关系到功能开发。
下面是几个我曾经主要分析了的优秀的,成熟的界面:
(1)手机QQ
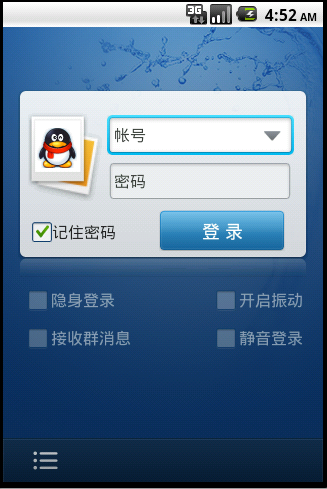
这个登录界面很清爽,很美观,我喜欢。
(2)Seesmic

这个好友列表看起来简约大方,很Cool。
(3)bump
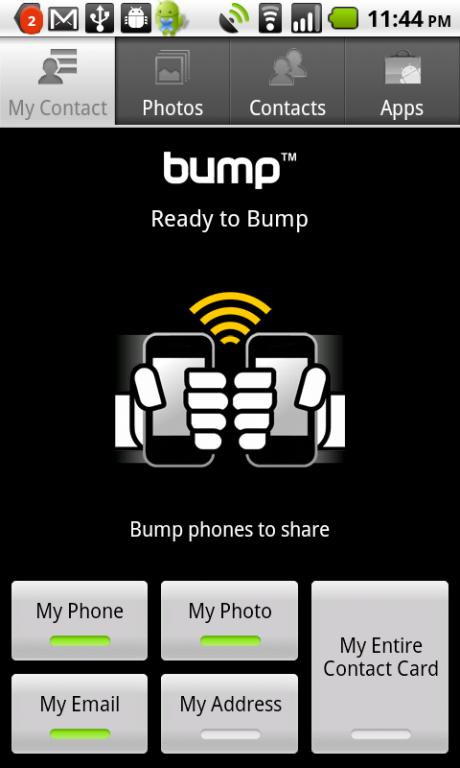
bump,很有创意的一款软件,它的界面和刚才那个的风格极为类似——简约不简单。同时你也可以看到TabActivity的重要性。
二、开端:android界面开发基础知识介绍
1.MVC模式和android界面开发
当我在欣赏四人帮(GoF)的《设计模式》的第一章时,就提到了这个在应用程序设计中最为经典的设计模式——MVC,也就是Model-View-Controller(模型-视图-控制器)。
这个模式的最大特点在我理解来看,就是实现了视图和控制器的分离,视图的更新经由模型,完全听由控制器的安排。详细了解请点击链接。
以下为《设计模式》书中原话的援引:

看到这段话你想到了什么?没错,想到了两个类:android.view.View和android.view.ViewGroup。前者很像上述文字中提到的View, 后者则很像CompositeView——而且ViewGroup就是View的子类,它还可以嵌套View以及ViewGroup。
没这么巧吧?
其实这不是一个巧合,而是android界面系统的构建本身就是一个借鉴了MVC模式的活生生的例子(有些地方说是C/S模式也是对的,但我个人觉得那是偏向管理方面的,真正结构上还是吸收了MVC模式的影子。而且更重要的是,C/S模式对于我们来说还太难懂,所以我选择了android擦了边的MVC来引入话题)。我们甚至可以找到android中对应于控制器的东西:android.view.ViewManager,虽然它仅仅是一个接口而已。然后你再想想那些常用的android.widget包中的会显示在屏上的类都是继承自View....是不是有一种豁然开朗的感觉啊?
看了这半天你也许会问,讲android界面开发好好的,为啥忽然跳到了设计模式上面来了?其实你应该了解这样一个事实:android也是人做出来的,能做出来,也就一定有它的依据——而所谓的设计模式也就是其中的依据之一。这么看来,如果想要了解android的实质,在 android的开发中能够更如鱼得水,设计模式是一定要研究的——这样至少可以让你了解到系统各个组件之间的依存关系。
希望了解到了MVC模式后,再去看看android参考文档,你能够对android的界面系统有一个较为本质性的深入化的了解。
再举两个在android中应用设计模式例子:
(1)老在开发中用到名字中带Factory的类,而其实这里属于工厂模式的范畴。
(2)你可以让你的Activity带上singleInstance的activity launch mode,而这里涉及到了单例模式。
更多的就等待你去发现了,不过发现了别忘了第一个告诉我啊!
2.关于一些界面开发中重要的组件
对于什么是Activity、什么是TextView等等,我就不多说了,因为大家都已经对这些有了一些基本的了解了。在这里,我想谈谈自己平时较常用到的一些界面开发组件的特点以及怎么用它。
(1)常用ViewGroup
一个界面的设计工作,第一步就是整个界面框架结构的设计,而这些框架结构在android中是用ViewGroup类别组件来实现的。ViewGroup有常见子类AbsoluteLayout, AdapterView<TextendsAdapter>, FrameLayout, LinearLayout, RelativeLayout, SlidingDrawer。
由于android设备市场现在群雄并起,所以各种显示特点的设备都有。为了让你家应用可以在各种机器上都能够得到最真实的写照,AbsoluteLayou最好还是别用了。要用的话你就必须有巧妙的技术避开其缺点,或者你就不得不针对每种设备设计一套独有的UI(当然我们是不会这样去做的)。
SlidingDrawer是一个还算炫的组件,它可以让你实现一个抽屉功能,进而去扩展那少的可怜的手机屏幕面积。在1.6时代的机子上Home界面下方的那个点了之后拉出很多应用的箭头就是SlidingDrawer的一个实例。
我个人使用的最多的是LinearLayout,RelativeLayout,AdapterView<TextendsAdapter>。
LinearLayout和RelativeLayout我主要用来进行界面的整体布局。
界面中经常出现一种几个widget成竖排或横排的形式出现的情况,这个时候通常就得用LinearLayout。它有一个属性:orientation,这个属性可以设置LinearLayout内部的组件是怎样排列的。
RelativeLayout没有LinearLayout死板,但比AbsoluteLayout要设备兼容性更强,所以一旦涉及到方位的布局,我一般会首先考虑它,它的一些类似于android:layout_alignLeft、android:layout_alignParentLeft等属性在方位布局上用起来总是得心应手。
而如果将刚才两把利器结合起来的话,你就会发现,只要是信息容量不大的界面,基本上用它们都可以实现布局了。例如刚才的手机QQ的登录界面就是这样的。
当界面中有大量的信息内容需要展现时,我们通常会想到AdapterView<TextendsAdapter>。
其实AdapterView<TextendsAdapter>(尖括号涉及到java中泛型的概念)只是一个抽象类,它是android中一类信息包含量极大,可以显示几乎各种形式数据的界面组件们的父类。而它的子类就包含了我们熟悉的Gallery, GridView, ListView, Spinner。这个系列的组件在显示数据时都会需要一个接口android.widget.Adapter的实现类帮忙,例如ArrayAdapter<T>, BaseAdapter, CursorAdapter,SimpleAdapter, SimpleCursorAdapter, SpinnerAdapter(相信大家都很熟悉了,所以就不简介了,而且我很怀疑这又是一个设计模式的实例,但还没找到具体是哪种,希望知道的同学告诉我)。
(2)常用View
界面结构弄好了,当然就是向里面加入东西了。常用的View(除去ViewGroup)有这些:TextView,ImageView,, ProgressBar,AutoCompleteTextView, Button, CheckBox,EditText,ImageButton, ImageSwitcher,RadioButton, RadioGroup,SeekBar,Spinner, TabHost, TabWidget, TableLayout,WebView等等等等,等等等等.....
可以说深入的了解这些组件是开发出西施级界面的必由之路。当然,限于篇幅,这里还是不一一介绍了,有兴趣的同学可以去网上搜索(我以后会把关于该组件的我看到的最好的博文以链结的方式放上来)。
在这里就和大家分享几个小经验:
(1).这些组件应该都有一个类似的构造方法:某某(Context context)。例如TextView就有构造方法TextView(Context context),这样以后如果你在java代码中想要生成一个View实例时,就可以用这个万金油式的构造方法(关于Context,刚接触时我也是很纳闷的,但看了这篇文章,和这篇文章后,我就有了一个大致的了解)。
(2).有时候你想在java文件里面设置一个组件的属性,但是你却不知道这个方法是否存在,那你就可可以去参看android文档中该类的XML Attributes一栏,这里罗列了该组件在xml文件中所有的可设置属性,更给力的是,这里也把该属性对应的java方法罗列了出来——如果xml属性后面有对应java方法,那你就可以很有福气的在java文档中调用了,如果没有,那你就只能自认倒霉了。举个例子:View类有一个xml属性是设置其背景的,名字叫做android:background="@%#$@%$#",而文档中它后面有一个setBackgroundResource(int)方法(如图),这就表明在java代码中你可以通过view实例来动态设置其背景了。

(3).这些组件其实并不是一成不变的——它们是具有极大的定制性的。这句话也就是说,你可以初级性的定义该组件的外观(后面的一个实例会提到这个),也可以高级性的定义该组件的行为——这些意味着,你可以设置一个Button在成为焦点,失去焦点,按下等等状态下的外观(点这里看例子),也可以设置该Button对触摸事件,按键事件等等做出怎样的反应(我又想起了事件机制,呵呵)。有了这些,难怪有些应用会然你看到一些组件很奇怪的反应——例如禁止单击,只许长按。
(4).这些组件的可设置属性大致可以这样分组:应用于该组件内部的,应用于该组件的。举个例子:android:layout_gravity属性设置的是该组件在其父组件内部的位置特性,而和其相对应的就有android:gravity来设置该组件子组件在其内部的位置特性;android:paddingLeft="10dip"指的是该组件内部组件里左边必须有10dip的距离,而android:marginLeft="10dip"则指的该组件离其父组件左边界必须有10dip的距离......
说了这么多,其实就是想给大家一个tip,希望大家能够在以后的界面开发中有什么想法后能够知道可以用什么组件去实现。还有一个观点想告诉大家,想了解一个android库类,最先想到的一定要是android文档——虽然是英文,但只有它才会告诉你最本源的信息。同时你也可以采取广而深的查看方法去地毯式的查看文档中某一方面的类——这样看就会有一个很全面的了解过程,印象也就会更深。在这里推荐大家看看android.view.View和android.app.Activity的文档,那里有许多很基础、很给力的知识。
3.关于开发工具
哎,到了这里,我就不得不吐槽下了:android的可视化界面开发工具——Layout Editor——刚开始用的真的很不习惯!竟然连vc的都不如,实在有点out了!
所以在这里推荐一个还算好的民间高手用java编写的DroidDraw(虽然还有些不完善,但它的“所见即所得”还是做的比Layout Editor好很多的):介绍在这里,下载在这里。
三、升华:高级技巧浅尝
哈哈,小生菜鸟,不敢鲁班门前甩斧头,在这里就简单说说几个自己了解的比较高手级别的做法吧。另外,雪地原地翻转720度凌空转体三周半空中抱头翻转两周半后跪求高手指教小弟。一日为师,终生为..你懂的。
1.自建widget
也就是说,你可以自己建立一个类继承于android.view.View类,然后override一些View的方法,之后再加上你的一些自己的实现,最终构成一个自己构建的widget(当然你也可以来一个自定义的ViewGroup,我可是不介意的)。有兴趣了解这方面知识的童鞋可以去百度上Google一下,这里就不贴具体帖子了。
另附文档中一段比较重要的文字:
Implementing a Custom View
To implement a custom view, you will usually begin by providing overrides for some of the standard methods that the framework calls on all views. You do not need to override all of these methods. In fact, you can start by just overridingonDraw(android.graphics.Canvas).
| Creation | Constructors | There is a form of the constructor that are called when the view is created from code and a form that is called when the view is inflated from a layout file. The second form should parse and apply any attributes defined in the layout file. |
|
Called after a view and all of its children has been inflated from XML. | |
| Layout | |
Called to determine the size requirements for this view and all of its children. |
|
Called when this view should assign a size and position to all of its children. | |
|
Called when the size of this view has changed. | |
| Drawing | |
Called when the view should render its content. |
| Event processing | |
Called when a new key event occurs. |
|
Called when a key up event occurs. | |
|
Called when a trackball motion event occurs. | |
|
Called when a touch screen motion event occurs. | |
| Focus | |
Called when the view gains or loses focus. |
|
Called when the window containing the view gains or loses focus. | |
| Attaching | |
Called when the view is attached to a window. |
|
Called when the view is detached from its window. | |
|
Called when the visibility of the window containing the view has changed. |
2.在源码环境下进行应用开发
没错,Google是很大方的,因为android实现了完全开源——你可以用Git这个代码版本管理工具下载整个android平台的源代码(甚至自己利用源码编译一个android平台出来,不过听说至少2小时)。但如果我告诉你,我们经常接触的android SDK仅仅只提供了这些源码中的一部分实现,你又会怎么看呢?嗯,不是Google小气,做这些隐藏实现其实是为了保证系统的安全性、稳定性(水果公司的隐藏实现部分还必须勤劳的开源社区人士破解出来才能使用,所以Google确实不是小气的)。当然,既然Google给了我们源码,我们就得好好利用它——在源码环境下实现android程序开发。在源码环境下,你可以实现sdk环境中无法实现的一些界面效果:例如用虚拟按钮来模拟Menu按键(后面有一帖子介绍)。这个是我即将进行探索的一个领域,所以现在还无法和大家分享自己的经验。就推荐两个帖子给大家解解馋吧:
(1)环境搭建:Android源码环境搭建
(2)实例:Android模拟按键——源码环境下开发应用程序
希望大家能够有志于android的高级技巧探索,然后和大家分享(我再次表示不会介意的)。
四、高潮:一个界面的实现
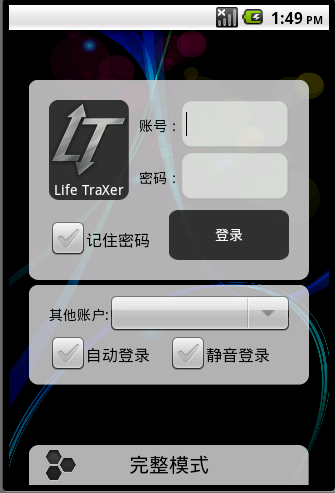
说了这么多,咱们“程序猿”该看点代码了。在这里就把我最新做出来的Life TraXer的欢迎界面以及Log In 界面的代码贴出来大家拍拍板砖。
1.欢迎界面的xml代码
- <?xmlversion="1.0"encoding="utf-8"?>
- <LinearLayoutxmlns:android="http://schemas.android.com/apk/res/android"
- android:orientation="vertical"
- android:background="@drawable/welcome_background"
- android:layout_width="fill_parent"
- android:layout_height="fill_parent">
- <LinearLayout
- android:layout_width="fill_parent"
- android:layout_height="fill_parent"
- android:background="@drawable/welcome_logo">
- <RelativeLayout
- android:layout_width="fill_parent"
- android:layout_height="390dip"
- >
- <TextView
- android:text="@string/welcome_moto"
- android:layout_height="wrap_content"
- android:layout_width="wrap_content"
- android:layout_alignParentBottom="true"
- android:layout_centerHorizontal="true"></TextView>
- </RelativeLayout>
- </LinearLayout>
- </LinearLayout>
2.欢迎界面的java代码(注意Handler那部分)
- packagecom.TheMessenger.LifeTraXer;
- importandroid.app.Activity;
- importandroid.content.Intent;
- importandroid.os.Bundle;
- importandroid.os.Handler;
- importandroid.util.Log;
- importandroid.view.Window;
- importandroid.view.WindowManager;
- publicclassWelcomeextendsActivity{
- privatefinalintSPLASH_DELAY_TIME=5000;
- privateStringTag="WelcomeActivity";
- @Override
- publicvoidonCreate(BundlesavedInstanceState){
- Log.i(Tag,"onCreate()");
- super.onCreate(savedInstanceState);
- getWindow().setFlags(WindowManager.LayoutParams.FLAG_FULLSCREEN,WindowManager.LayoutParams.FLAG_FULLSCREEN);
- requestWindowFeature(Window.FEATURE_NO_TITLE);
- setContentView(R.layout.welcome);
- newHandler().postDelayed(
- newRunnable()
- {
- @Override
- publicvoidrun(){
- //TODOAuto-generatedmethodstub
- startActivity(newIntent(Welcome.this,Login.class));
- Welcome.this.finish();
- }
- }
- ,SPLASH_DELAY_TIME);
- }
- }
3.登陆界面xml代码(看看嵌套的方式)
- <?xmlversion="1.0"encoding="utf-8"?>
- <LinearLayout
- xmlns:android="http://schemas.android.com/apk/res/android"
- android:orientation="vertical"
- android:background="@drawable/login_background"
- android:layout_width="fill_parent"
- android:layout_height="fill_parent">
- <RelativeLayout
- android:layout_height="250dip"
- android:layout_width="fill_parent">
- <RelativeLayout
- android:layout_centerHorizontal="true"
- android:layout_alignParentBottom="true"
- android:layout_height="200dip"
- android:layout_width="280dip"
- android:background="@drawable/login_input_area_background">
- <LinearLayout
- android:orientation="vertical"
- android:layout_height="160dip"
- android:layout_width="240dip"
- android:layout_centerInParent="true">
- <LinearLayout
- android:orientation="horizontal"
- android:layout_height="100dip"
- android:layout_width="fill_parent">
- <LinearLayout
- android:layout_width="80dip"
- android:layout_height="fill_parent"
- android:orientation="vertical"
- android:background="@drawable/login_input_area_logo_background">
- <ImageView
- android:layout_width="fill_parent"
- android:layout_height="80dip"
- android:src="@drawable/login_input_area_logo"/>
- <TextView
- android:layout_width="fill_parent"
- android:layout_height="20dip"
- android:gravity="center_horizontal"
- android:text="@string/login_textview_app_name_text"
- android:textColor="@drawable/white"/>
- </LinearLayout>
- <RelativeLayout
- android:layout_width="160dip"
- android:paddingLeft="10dip"
- android:layout_height="fill_parent">
- <LinearLayout
- android:orientation="horizontal"
- android:layout_width="fill_parent"
- android:layout_height="48dip"
- android:layout_alignParentLeft="true"
- android:layout_alignParentTop="true">
- <TextView
- android:layout_width="42dip"
- android:layout_height="50dip"
- android:text="@string/login_textview_username_text"
- android:textColor="@drawable/black"/>
- <EditText
- android:id="@+id/login_edittext_username"
- android:padding="5dip"
- android:layout_width="108dip"
- android:layout_height="fill_parent"
- android:background="@drawable/login_edittext_background"
- android:textColor="@drawable/black"
- android:singleLine="true"/>
- </LinearLayout>
- <LinearLayout
- android:orientation="horizontal"
- android:layout_width="fill_parent"
- android:layout_height="48dip"
- android:layout_alignParentLeft="true"
- android:layout_alignParentBottom="true">
- <TextView
- android:layout_width="42dip"
- android:layout_height="50dip"
- android:text="@string/login_textview_password_text"
- android:textColor="@drawable/black"/>
- <EditText
- android:id="@+id/login_edittext_password"
- android:padding="5dip"
- android:layout_width="108dip"
- android:layout_height="fill_parent"
- android:background="@drawable/login_edittext_background"
- android:textColor="@drawable/black"
- android:password="true"
- android:singleLine="true"/>
- </LinearLayout>
- </RelativeLayout>
- </LinearLayout>
- <RelativeLayout
- android:layout_height="60dip"
- android:layout_width="fill_parent">
- <CheckBox
- android:id="@+id/login_checkbox_remember_password"
- android:layout_height="40dip"
- android:layout_width="120dip"
- android:layout_alignParentLeft="true"
- android:layout_alignParentBottom="true"
- android:text="@string/login_checkbox_remember_password_text"
- android:textColor="@drawable/black"/>
- <Button
- android:id="@+id/login_button_log_in"
- android:layout_height="50dip"
- android:layout_width="120dip"
- android:gravity="center"
- android:background="@drawable/login_button_log_in_selector"
- android:layout_alignParentRight="true"
- android:layout_alignParentBottom="true"
- android:text="@string/login_button_log_in_text"
- android:textColor="@drawable/white"/>
- </RelativeLayout>
- </LinearLayout>
- </RelativeLayout>
- </RelativeLayout>
- <RelativeLayout
- android:layout_height="110dip"
- android:layout_width="fill_parent">
- <RelativeLayout
- android:layout_width="280dip"
- android:layout_height="100dip"
- android:layout_centerInParent="true"
- android:background="@drawable/login_others_background">
- <LinearLayout
- android:orientation="vertical"
- android:layout_width="240dip"
- android:layout_height="80dip"
- android:layout_centerInParent="true">
- <LinearLayout
- android:orientation="horizontal"
- android:layout_width="fill_parent"
- android:layout_height="40dip">
- <TextView
- android:layout_height="fill_parent"
- android:layout_width="wrap_content"
- android:gravity="center"
- android:text="@string/login_spinner_more_users_text"
- android:textColor="@drawable/black"/>
- <Spinner
- android:id="@+id/login_spinner_more_users"
- android:layout_height="fill_parent"
- android:layout_width="182dip"/>
- </LinearLayout>
- <LinearLayout
- android:orientation="horizontal"
- android:layout_width="fill_parent"
- android:layout_height="40dip">
- <CheckBox
- android:id="@+id/login_checkbox_auto_log_in"
- android:layout_width="120dip"
- android:layout_height="fill_parent"
- android:text="@string/login_checkbox_auto_log_in_text"
- android:textColor="@drawable/black"/>
- <CheckBox
- android:id="@+id/login_checkbox_mute_log_in"
- android:layout_width="120dip"
- android:layout_height="fill_parent"
- android:text="@string/login_checkbox_mute_log_in_text"
- android:textColor="@drawable/black"/>
- </LinearLayout>
- </LinearLayout>
- </RelativeLayout>
- </RelativeLayout>
- <RelativeLayout
- android:layout_width="fill_parent"
- android:layout_height="fill_parent">
- <RelativeLayout
- android:orientation="horizontal"
- android:layout_height="40dip"
- android:layout_width="280dip"
- android:layout_alignParentBottom="true"
- android:layout_centerHorizontal="true"
- android:background="@drawable/login_bottom_bar_background"
- android:paddingLeft="10dip">
- <Button
- android:id="@+id/login_button_log_in_mode"
- android:layout_width="40dip"
- android:layout_height="40dip"
- android:layout_alignParentLeft="true"
- android:background="@drawable/login_button_log_in_mode_selector"/>
- <TextView
- android:id="@+id/login_textview_current_log_in_mode"
- android:layout_height="40dip"
- android:layout_width="120dip"
- android:layout_centerInParent="true"
- android:gravity="center"
- android:text="@string/login_textview_log_in_complete_mode_text"
- android:textColor="@drawable/black"
- android:textSize="20sp"
- />
- </RelativeLayout>
- </RelativeLayout>
- </LinearLayout>
4.登录界面的java
- packagecom.TheMessenger.LifeTraXer;
- importandroid.app.Activity;
- importandroid.app.AlertDialog;
- importandroid.app.Dialog;
- importandroid.content.DialogInterface;
- importandroid.content.Intent;
- importandroid.os.Bundle;
- importandroid.util.Log;
- importandroid.view.KeyEvent;
- importandroid.view.Menu;
- importandroid.view.MenuInflater;
- importandroid.view.MenuItem;
- importandroid.view.View;
- importandroid.view.Window;
- importandroid.widget.Button;
- importandroid.widget.TextView;
- publicclassLoginextendsActivity{
- privatefinalStringTag="LoginActivity";
- privatefinalintON_EXIT_DIALOG=1;
- privatefinalintABOUT_US_DIALOG=2;
- privatefinalintLOG_IN_MODE_SELECT_DIALOG=3;
- privateAlertDialogonExitDialog;
- privateAlertDialogaboutUsDialog;
- privateButtonbuttonLogin;
- privateButtonbuttonLoginMode;
- privateTextViewtextViewLoginMode;
- @Override
- publicvoidonCreate(BundlesavedInstanceState){
- Log.i(Tag,"onCreate()");
- super.onCreate(savedInstanceState);
- requestWindowFeature(Window.FEATURE_NO_TITLE);
- setContentView(R.layout.before_login);
- initializeView();
- }
- @Override
- publicbooleanonKeyDown(intkeyCode,KeyEventevent){
- if(keyCode==KeyEvent.KEYCODE_BACK&&event.getRepeatCount()==0){
- dialogFactory(ON_EXIT_DIALOG).show();
- }
- returnfalse;
- }
- @Override
- publicbooleanonCreateOptionsMenu(Menumenu){
- MenuInflatermInflater=getMenuInflater();
- mInflater.inflate(R.menu.login_menu,menu);
- returntrue;
- }
- @Override
- publicbooleanonOptionsItemSelected(MenuItemitem){
- switch(item.getItemId()){
- caseR.id.login_menu_delete_username:
- /*还没完成*/
- break;
- caseR.id.login_menu_set_net:
- startActivity(newIntent("android.settings.WIRELESS_SETTINGS"));
- break;
- caseR.id.login_menu_about_us:
- dialogFactory(ABOUT_US_DIALOG).show();
- break;
- caseR.id.login_menu_exit_app:
- dialogFactory(ON_EXIT_DIALOG).show();
- break;
- default:
- break;
- }
- returnsuper.onOptionsItemSelected(item);
- }
- privateDialogdialogFactory(intdialogType){
- switch(dialogType){
- caseON_EXIT_DIALOG:
- returncreateOnExitDialog();
- caseABOUT_US_DIALOG:
- returncreateAboutUsDialog();
- caseLOG_IN_MODE_SELECT_DIALOG:
- returncreateLoginModeDialog();
- }
- returnnull;
- }
- privateDialogcreateOnExitDialog(){
- AlertDialog.BuilderdialogBuilder=newAlertDialog.Builder(this);
- ViewdialogView=this.getLayoutInflater().inflate(R.layout.login_alertdialog_on_exit,null);
- dialogBuilder.setView(dialogView);
- onExitDialog=dialogBuilder.create();
- dialogView.findViewById(R.id.login_button_alertdialog_on_exit_yes)
- .setOnClickListener(
- newButton.OnClickListener()
- {
- @Override
- publicvoidonClick(Viewv){
- Login.this.finish();
- }
- }
- );
- dialogView.findViewById(R.id.login_button_alertdialog_on_exit_no)
- .setOnClickListener(
- newButton.OnClickListener()
- {
- @Override
- publicvoidonClick(Viewv){
- onExitDialog.dismiss();
- }
- }
- );
- returnonExitDialog;
- }
- privateDialogcreateAboutUsDialog(){
- AlertDialog.BuilderdialogBuilder=newAlertDialog.Builder(this);
- ViewdialogView=this.getLayoutInflater().inflate(R.layout.login_alertdialog_about_us,null);
- dialogBuilder.setView(dialogView);
- aboutUsDialog=dialogBuilder.create();
- dialogView.findViewById(R.id.login_button_alertdialog_about_us_ok)
- .setOnClickListener(
- newButton.OnClickListener(){
- @Override
- publicvoidonClick(Viewv){
- aboutUsDialog.dismiss();
- }
- }
- );
- returnaboutUsDialog;
- }
- privateDialogcreateLoginModeDialog(){
- returnnewAlertDialog.Builder(this)
- .setTitle(R.string.login_dialog_login_mode_select_title_text)
- .setItems(
- R.array.login_mode_selector_array
- ,
- newDialogInterface.OnClickListener(){
- @Override
- publicvoidonClick(DialogInterfacedialog,intwhich){
- switch(which){
- case0:
- textViewLoginMode.setText("完整模式");
- /*没有完成*/
- break;
- case1:
- textViewLoginMode.setText("Gps模式");
- /*没有完成*/
- break;
- case2:
- break;
- }
- }
- })
- .create();
- }
- privatevoidinitializeView()
- {
- buttonLogin=(Button)findViewById(R.id.login_button_log_in);
- buttonLogin.setOnClickListener(
- newButton.OnClickListener()
- {
- @Override
- publicvoidonClick(Viewv){
- startActivity(newIntent(Login.this,DuringLogin.class));
- }
- }
- );
- buttonLoginMode=(Button)findViewById(R.id.login_button_log_in_mode);
- buttonLoginMode.setOnClickListener(
- newButton.OnClickListener()
- {
- @Override
- publicvoidonClick(Viewv){
- dialogFactory(LOG_IN_MODE_SELECT_DIALOG).show();
- }
- }
- );
- textViewLoginMode=(TextView)findViewById(R.id.login_textview_current_log_in_mode);
- }
- }
5.实际效果贴图
欢迎界面

登录界面
五、尾声:鸣谢
好啦,鸣谢:摆渡、谷哥。
各位看官,谢谢围观。
如有纰漏,欢迎拍砖!


发表评论

相关推荐
Android界面开发技巧50则,针对具体的问题,都有在论坛给出的解决方案和代码。
android界面开发笔记相关代码
android 界面开发测试
Android 界面 设计 开发 工具Android 界面 设计 开发 工具
Android界面开发工具DroidDraw DroidDraw就是专门为Android开发程序设计界面的工具.
Android.User.Interface.Development.Beginners,超清晰android界面开发电子书(老外写的)
android界面开发工具,包括android端的apk文件和pc端的exe文件,android开发必备
Android图形用户界面(UI)开发教程合集,Android入门和用户界面开发教程。
Android开发中,界面开发的颜色集合,推荐使用
方便android界面开发,给大家分享轻巧的android应用界面开发工具。
android UI界面开发图片,数量巨大,而且经典,觉得值得收藏 android UI界面开发图片,数量巨大,而且经典,觉得值得收藏
这不是什么一键锁屏,是类似“go锁屏”那样的锁屏界面。 基本功能已经全部实现,并且有详细的解释和使用方法说明。 基本功能包括: 解锁屏幕 取代主屏幕launcher 完美屏蔽home键(避免home键重复锁,避免非解锁状态...
android开发主界面框架
Android界面开发基础,深入浅出界面开发基础视频讲解。内容包括android界面开发学习方法、事件机制和如何自定义开发组件.内容来自网上收集,作者sundy
Android开发登陆界面布局
android界面开发推荐颜色.pdf