主机平台:Gentoo 11.2
内核版本:Linux Kernel 3.2.1
CPU型号:Pentium Dual-Core T2370 32-bit
原创作品,转载请标明出处http://blog.csdn.net/yming0221/article/details/7354039
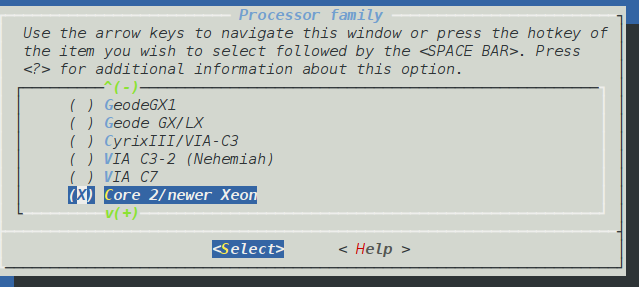
1、通过查看CPU的信息可以看到Intel Core 2 Duo/Quad / Xeon 51xx/53xx, Pentium Dual-Core T23xx+/Exxxx的硬件信息如下:

首先设置/etc/make.conf中CFLAGS
我的make.conf文件如下:
CFLAGS="-O2 -march=prescott -pipe -fomit-frame-pointer"
CXXFLAGS="${CFLAGS}"
# WARNING: Changing your CHOST is not something that should be done lightly.
# Please consult http://www.gentoo.org/doc/en/change-chost.xml before changing.
CHOST="i686-pc-linux-gnu"
MAKEOPTS="-j3"
USE="gnome X dbus v4l -qt3 -qt4 gtk laptop samba -kde -arts consolekit policykit udev alsa cdr -cups -bluetooth"

GENTOO_MIRRORS="http://mirrors.163.com/gentoo"

SYNC="rsync://mirrors.163.com/gentoo-portage/"

LINGUAS="en_US en_GB uk zh_CN "
如果机器是64位的,则设置CFLAGS如下:
CHOST="x86_64-pc-linux-gnu"
CFLAGS="-march=nocona -O2 -pipe -fomit-frame-pointer"
2、内核编译选项
如果你的处理器是双核的,那么激活这个选项:
| Linux Kernel Configuration: |
Processor type and features --->
[*] Symmetric multi-processing support
(2) Maximum number of CPUs (2-256)
[ ] SMT (Hyperthreading) scheduler support
[*] Multi-core scheduler support
|
如果你的系统是32bit的,那么激活这个选项:
| Linux Kernel Configuration: |
Processor type and features --->
[*] Machine Check Exception
< > Check for non-fatal errors on AMD Athlon/Duron / Intel Pentium 4
|
如果是64bit的,激活这个选项:
| Linux Kernel Configuration: |
Processor type and features --->
-- Machine check support
[*] Intel MCE features
Executable file formats / Emulations --->
[*] IA32 Emulation
|
3、自动降频
内核的配置
|
Linux Kernel Configuration:CPU frequency scaling |
Power management options --->
ACPI (Advanced Configuration and Power Interface) Support --->
[*] ACPI Support
<*> Processor
CPU Frequency scaling --->
[*] CPU Frequency scaling
<*> CPU frequency translation statistics
[*] CPU frequency translation statistics details
|
省电方式(Governor)它们决定了你的CPU运行的频率。最常用到的可能是'按需分配(ondemand)'和'保守(conservative)'了。你可以按照你的需要来进行调整。
- Conservative 将CPU设置为最省电的状态,当CPU需要使用更多电力的时候一步步地提升CPU的频率.
- Ondemand 将CPU的频率设置为最低,当CPU在最低频率时如果使用率达到100%把CPU的频率提升到额定频率。
- Powersave将CPU的频率一直设置为最低。
- Performance 使CPU保持额定频率运行。
- Userspace 允许你手动设置CPU的频率。
你可以随时改变你的CPU的省电方式。
|
Linux Kernel Configuration:governor |
Power management options --->
CPU Frequency scaling --->
# E.g. for ondemand
<*> 'ondemand' cpufreq policy governor
|
自动降频的驱动你需要启用系统的CPU频率调整驱动.intel Core Solo/Duo, Intel Core2 Solo/Duo 的驱动是ACPI Processor P-States driver 。它已经被包含到内核中了。编译时在下面这个位置启用。
|
Linux Kernel Configuration:CPU frequency scaling driver |
Power management options --->
CPU Frequency scaling --->
# E.g. for Intel Core2 Duo
<*> ACPI Processor P-States driver
|
软件现在你需要安装一些软件来完成自动降频的工作.emerge --ask --verbose cpufrequtils
下面这个命令可以查看具体有哪些哪些省电方式:cat /sys/devices/system/cpu/cpu0/cpufreq/scaling_available_governors
现在你知道你需要使用哪种省电方式了,编辑/etc/conf.d/cpufrequtils文件来设置你想要的方式。默认的是ondemand.最后,启用CPU自动降频/etc/init.d/cpufrequtils start
你启用了它之后它不会在每次启动后自动运行,所以你需要把它加入rc脚本中。
rc-update add cpufrequtils boot
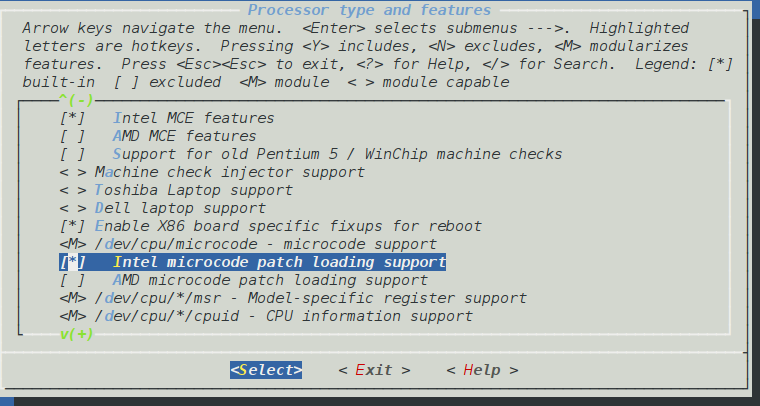
4、微码(microcode)的设置
芯片内置的微代码,用于升级CPU中的微程序以修正处理器的BUG
首先添加内核的微码支持
然后添加软件的支持,并添加到开机启动服务自动运行。
sudo emerge emerge -av microcode-ctl
sudo /etc/init.d/microcode_ctl start
sudo rc-update add microcode_ctl default
启动后lsmod查看下有没有microcode模块
如果没有modprobe一下
下面是信息日志
2012-03-14T16:09:01.441949+08:00 yan-laptop kernel: [27137.253418] Registering platform device 'microcode'. Parent at platform
2012-03-14T16:09:01.441986+08:00 yan-laptop kernel: [27137.253423] device: 'microcode': device_add
2012-03-14T16:09:01.455766+08:00 yan-laptop kernel: [27137.253432] bus: 'platform': add device microcode
2012-03-14T16:09:01.455797+08:00 yan-laptop kernel: [27137.253442] PM: Adding info for platform:microcode
2012-03-14T16:09:01.455804+08:00 yan-laptop kernel: [27137.253470] microcode: CPU0 sig=0x6fd, pf=0x80, revision=0xa1
2012-03-14T16:09:01.455810+08:00 yan-laptop kernel: [27137.253477] platform microcode: firmware: requesting intel-ucode/06-0f-0d
2012-03-14T16:09:01.455815+08:00 yan-laptop kernel: [27137.253482] device: 'microcode': device_add
2012-03-14T16:09:01.455819+08:00 yan-laptop kernel: [27137.253493] PM: Adding info for No Bus:microcode
2012-03-14T16:09:01.490927+08:00 yan-laptop kernel: [27137.302793] device: 'microcode': device_unregister
2012-03-14T16:09:01.490964+08:00 yan-laptop kernel: [27137.302799] PM: Removing info for No Bus:microcode
2012-03-14T16:09:01.490970+08:00 yan-laptop kernel: [27137.302852] microcode: CPU1 sig=0x6fd, pf=0x80, revision=0xa1
2012-03-14T16:09:01.490976+08:00 yan-laptop kernel: [27137.302859] platform microcode: firmware: requesting intel-ucode/06-0f-0d
2012-03-14T16:09:01.490981+08:00 yan-laptop kernel: [27137.302864] device: 'microcode': device_add
2012-03-14T16:09:01.490986+08:00 yan-laptop kernel: [27137.302878] PM: Adding info for No Bus:microcode
2012-03-14T16:09:01.508965+08:00 yan-laptop kernel: [27137.320982] device: 'microcode': device_unregister
2012-03-14T16:09:01.509000+08:00 yan-laptop kernel: [27137.320988] PM: Removing info for No Bus:microcode
2012-03-14T16:09:01.509006+08:00 yan-laptop kernel: [27137.321062] device: 'microcode': device_add
2012-03-14T16:09:01.509922+08:00 yan-laptop kernel: [27137.321213] PM: Adding info for No Bus:microcode
2012-03-14T16:09:01.509939+08:00 yan-laptop kernel: [27137.321238] microcode: Microcode Update Driver: v2.00 <tigran@aivazian.fsnet.co.uk>, Peter Oruba
2012-03-14T16:09:36.164996+08:00 yan-laptop kernel: [27171.976391] microcode: CPU0 updated to revision 0xa4, date = 2010-10-02
2012-03-14T16:09:36.165032+08:00 yan-laptop kernel: [27171.976823] microcode: CPU1 updated to revision 0xa4, date = 2010-10-02
2012-03-14T16:09:36.258277+08:00 yan-laptop kernel: [27172.069653] device: 'microcode': device_unregister
2012-03-14T16:09:36.258314+08:00 yan-laptop kernel: [27172.069658] PM: Removing info for No Bus:microcode
2012-03-14T16:09:36.258321+08:00 yan-laptop kernel: [27172.069764] device: 'microcode': device_create_release
2012-03-14T16:09:36.258327+08:00 yan-laptop kernel: [27172.069794] PM: Removing info for platform:microcode
2012-03-14T16:09:36.258332+08:00 yan-laptop kernel: [27172.069804] bus: 'platform': remove device microcode
2012-03-14T16:09:36.258337+08:00 yan-laptop kernel: [27172.069817] microcode: Microcode Update Driver: v2.00 removed.
升级成功。
更多Gentoo的维护请参考Gentoo Linux维护(专栏)
参考:
http://en.gentoo-wiki.com/wiki/Intel_Microcode
http://hi.baidu.com/goomw/blog/item/3fc65a1b86cf97d2ac6e757f.html
分享到:


相关推荐
Gentoo Linux文档 -- Gentoo Linux x86手册
在sun服务器上安装gentoo linux 2007 目前sun服务器只能安装gentoo debian
Gentoo Linux 安装笔记 Gentoo Linux 安装笔记 Gentoo Linux 安装笔记
Gentoo Linux 安装手册, Gentoo Linux安装完整教程, 内容详细, 包你一次就会, 绝对精彩. Gentoo Linux 安装手册完整教程!
[1]Gentoo Linux是一种可以针对任何应用和需要而自动优化和自定义的特殊的Linux发行版。Gentoo拥有优秀的性能、高度的可配置性和一流的用户及开发社区。 由于[2]Portage技术的产生,Gentoo Linux可以担当一个理想的...
gentoolinux安装教程
Gentoo的手册,中文,对安装和研究linux很有帮助。 gentoo是很独特的发行版,和其他不同,安装需要手动一步步进行,软件安装也类似freebsd的port方式。具有高度定制性。
介绍gentoo搭建方法,让你了解gentoo的总体架构,以及安装方法。
gentoo-portage-rsync-mirror, Gentoo库的镜像镜像,使用 https 以前的Gentoo rsync-to-git镜像用于包含打包到git存储库中的Gentoo树的存储库。 然而,在 2015-08-09,Gentoo正式切换到了 git,这使得。新资源:cgit...
Gentoo Linux 2008 x86手册(安装) Gentoo Linux 2008 x86手册(安装)
修补程序文件,用于在Linux内核4.0.4上构建Gentoo的vmware-modules-279.3软件包。 使程序包编译无误,并允许vmware-player运行。 使用风险自负。 指示: 手动克隆存储库或单独下载文件。 在终端中,将补丁文件放在...
SUN服务器安装Gentoo Linux全程指导,提供安装指南
资源来自pypi官网。 资源全名:binary_gentoo-5.0.0-py3-none-any.whl
gentoo linux 的安装,本人学习gentoo linux 3年的结晶,写成文档,仅供学习参考。
资源分类:Python库 所属语言:Python 资源全名:binary_gentoo-5.0.1-py3-none-any.whl 资源来源:官方 安装方法:https://lanzao.blog.csdn.net/article/details/101784059
gentoo-pxe-builder目的此PXE构建器的目的是让您从PXE引导计算机,然后自动对其进行设置,以便可以使用SSH远程访问它。 引导此PXE initramfs将显示有关PXE主机上可用网络接口的信息,因此您无需键入任何命令即可连接...
gentoo-kernel-guide:在Gentoo Linux上配置和管理内核的更好方法